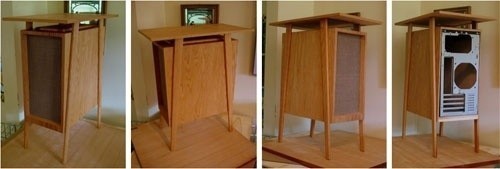
Wooden PC Case
Inspiration
I have always liked stylish wooden cases but there's only ever been a handful out there on the Internet.
 Now, I'm far from a master woodworker but I do have some basic tools I've gathered lately due to my
increasing interest in building pallet furniture and working with wood in general. So when I came across
this mid-century office piece, I liked it's retro yet
simple design. Simple enough I felt I could recreate it. Originally, I had only seen a picture or two of
this case and that is what I worked from. Had I found the link above earlier, it would've answered a few
questions I had early on.
Now, I'm far from a master woodworker but I do have some basic tools I've gathered lately due to my
increasing interest in building pallet furniture and working with wood in general. So when I came across
this mid-century office piece, I liked it's retro yet
simple design. Simple enough I felt I could recreate it. Originally, I had only seen a picture or two of
this case and that is what I worked from. Had I found the link above earlier, it would've answered a few
questions I had early on.
The build
Having just switched over from the Army to a low paying crappy job, money was tight. I tried to get away
as much as I could with materials I already had on hand. First thing to decide on is a case since I will be using
an existing frame to slide into the finished piece. I chose the smallest mid-tower I had on hand. I'm not sure
of the brand, it had no markings on it anywhere, but I recall it was a under $30 from Micro Center at the time.
Step 1 was to take off the front panel and carefully disconnect the front IO ports. I still wasn't sure yet if I
would reuse these ports or not, but kept them just in case.


If it matters to anyone, the internal components are an Abit IP35 Pro motherboard stuffed with an Intel Core 2 Duo CPU, 4x2GB Crucial Ballistix DDR2-800, a GeForce 8600 GTS, and an Audigy 2 ZS platinum. I currently have Cent 6.7 installed on it.
Step 2
I took some measurements and to wrap the case I would need a 2'x4' piece of wood. And when I say 4', it's almost exact. I had
no room for error when cutting the 4 pieces that would assemble the box. With a few extra inches (or a bigger budget for an extra
board) and some further skill I don't yet posess, I would have joined the box using dovetail joints. But I don't have a router and
last time I tried to make a joint like that using a hammer and flat screwdriver, it wasn't pretty. The original designer used oak,
which is expensive, so I used pine. For about $8, I got a 2'x4' half inch thick piece of pine plywood. It had a nice smooth surface
and required very little sanding.
So once I measured and cut the boards using a circular saw (my table saw was too small for the extra long board), it was time to glue
the pieces together. I don't trust glue alone, despite it may hold up just fine. So I used a few 1/4" dowel rods. With the plywood only
half an inch thick, that leaves only 1/8" on either side of the dowel with no room for error when drilling the holes. Biscuits might have
been a better alternative here if you have a biscuit joiner, which I do not.


Since the top and bottom pieces float between the two sides, I didn't want the bottom piece to just hang from the sides with the tower sitting on it with nothing but the glue holding it up. I didn't want to use screws anywhere in the project, so dowels was the only solution. When done correctly, it also helps keep your boards square when joining them together as you can see in the center photo. With the PC frame inside for added stability during the gluing process, I began to add my clamps. You can never have too many clamps!
Step 3
Yay, I now have a plywood box! Ok, so it doesn't look like much yet, but it'll get there. Once the glue dried, I was left with a very sturdy box with no wiggle or wobble. I began sanding all the edges until I couldn't feel any transition at all where the boards meet and finished up with a 400 grit sandpaper for a real smooth finish. I used my orbital palm sander to round off the edges just a little for a bit of a bevel. Whiped the dust away and it was time to apply a finish. I stuck with the natural tone of the pine wood and only applied a semi-gloss polyurethane. Having never used polyurethane before, I did some sanding with 220 between coats about 3 different times before I got used to applying the finish without leaving any brush strokes behind. It also didn't help that the first brush I used kept breaking bristles off in the finish, which was very infuriating. After that first coat, I threw the brush out and bought some new natural bristle brushes for 75 cents a piece at the Habitat for Humanity ReStore.


To be honest, the lighting in my basement doesn't really do it justice. But the finish is coming along rather nicely so far with about 4 coats of polyurethane.
Step 4
Ok, now here's where things got a little tricky. Using two 1"x2"x48" pieces, I cut in half for four equal 2' long legs. Considering how each piece was only $2.50 each, I'm starting to wish I had spent the extra $5 to buy two more so I could make the legs just a little taller. Once again I used dowels to help hold the legs on, two on each one. Careful measurement and drilling and I was ready to glue them on. Unsure of how well wood glue would work on the polyurethane finish, I scuffed up the area with 40 grit where the legs would lie against the body of the case. Once glued into place, I again applied the clamps. I did one side at a time.


If you're still wondering what was tricky about the legs, take a look at the middle image again. Since I just eyeballed the position of the first leg to what I thought looked good and measured matching holes to the other legs, I have no idea what angle those legs are at. And now that I have the legs already firmly attached, cutting the tops and bottom of those legs to be parallel to the ground becomes more challenging. I marked some measurements from the top and bottom of the case so I could score a line that would hopefully give me an even leg once placed on the ground. I used a hand saw for this because with how small of a chunk I was cutting off on some of the legs, I felt a jigsaw might not give me a square cut. So if you attempt to build this yourself, measure your angles, set your table saw accordingly, and cut those legs before gluing them.
Step 5
While I wait for the final coat of polyurethane to dry, I can start working on the float top piece. I couldn't find a 2'x2' board at Home Depot in the thickness I wanted, so I decided I'll just make my own. For about $10, I bought a 7' board about 8" wide and 3/4" thick. I cut two 20" pieces and trimmed them down to about 6 1/4" wide. Using 3 dowel rods to help join the two boards together and keep them nice and flat at the joint, I applied some wood glue and threw on my clamps.


Once the glue finished drying, I sanded the whole thing. First with 120, then 400 for the top and bottom. For the rough edges, I used 60 grit to take a little off the edge of one board that was just slightly longer than the other. Then I just smoothed the edges the same as I did the top. I applied a layer of polyurethane and will wait until morning. A coat before work and another when I get home has been the routine for the past week. A dowel rod and a dab of glue at each leg will help hold this top piece in place. The last thing to do after that is to finish the front.
Step 6
As of Nov 29 2015, I'm still searching for the right fabric to cover the front. I've been to fabric stores, vintage shops, and antique stores looking for either fabric or an old speaker I can utilize. So far no luck. It looks like I may just have to order something online.