Working with UV coordinates in AGK
UV coordinates are texture coordinates and tell a sprite how an image should be mapped to it. You've no doubt heard of UV mapping before in the 3D world, and this is really no different. If you are familiar with 3D modelling, you can think of an AGK sprite as a textured quad (or plane). If not, then image a square where each corner is a vertex. Each of the 4 vertices in the sprite hold UV data relating to a part of the image that shows up on the sprite. The coordinates to the top-left corner of an image is [0,0] and the bottom-right corner coordinates are [1,1]. Any floating point value between 0 and 1 will lie somewhere within that image. UV can also be looked at XY on the image. The U represents the horizontal value along the X axis and the V is the vertical value along Y axis of the image. So if you had UV values of [0.5,0.5] you'd be sampling from the center of the image.
If you look at AGK's SetSpriteUV command, you'll notice it takes 8 parameters, aside from the sprite index that is. These 8 values correspond the UV coordinates of the 4 vertices. The ordering of the vertices are not clockwise as you may think. You need to know the order of these vertices to be able to properly make use of this command. The illustration below will show you the order of the 4 vertices.
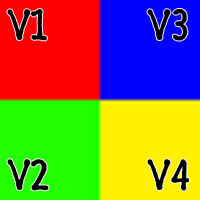
To display the full image on a sprite, the UV coordinates are set by default to the following values:
V1 = [0,0]
V2 = [0,1]
V3 = [1,0]
V4 = [1,1]
If you were to change the coordinates of vertex 3 to the same as vertex 1, then that corner will sample from the top-left of the image as well, causing the other corners to interpolate the texture inbetween and it would look like this:
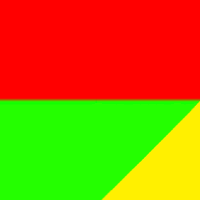
If you can visualize what's happening, you've basically grabbed the upper left corner of the image and dragged it over to the left, causing the texture to stretch over. So what can you do with this? Well, AGK already has a function for clipping a sprite's viewable area on screen, SetSpriteScissor, but you could write your own clipping function if you had to by manipulating the UV data. To avoid the texture from appearing stretched out you would also need to resize the sprite.
Another fun trick you can do is simulate the effect of grass waving in the wind. Imagine a 2D platform game and you have several clumps of tall grass. You can gradually shift the top of the sprite's UV data (V1 and V3) to sway back and forth.
I hope this helped clarify any questions you may have had about sprite UV data; what it is, how to use it.