Building a tilemap in AGK
Getting Started
So you want to build your own tilemap using AGK? This tutorial will teach just how to do that while also building a good framework you can build upon later.
First thing you need to do is grab the image below, this will be the tileset used for this tutorial. This is an old tileset I create many years ago but never
finished due to a harddrive failure that caused me to lose the original PSD file. You're free to use it for whatever you wish. Place 'tileset.png' into the media
folder of your project.
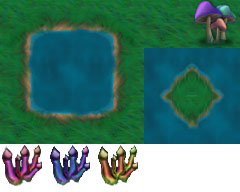
The tile size is 48 x 48, giving us a total of 20 tiles (5 across by 4 down).
The map will technically use 1 sprite that is hidden. I say that because all the tiles will be a clone of that single sprite. As cloned sprites will share the image
data of the original it will save memory. To keep things small and simple, create an AGK project with a resolution of only 640x480.
Map Format
The first thing I'll go over is the format of the map we'll use. Look at the image below to see how different tiles are numbered.
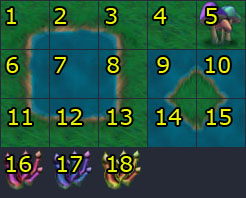
This image will be loaded and turned into an animated sprite, each animation frame will pertain to a different tile.
To keep the map file simple, we will be doing a simple text file. The first line needs to define some parameters of the map.
8,6,48,tileset.png
The first two values represet the width and height of the map, respectively. This isn't in pixels but the number of tiles. The third value, 48, represents
the tile size as used in the tileset image. In this case it is assumed the tiles are square and 48 will be used for both the width and height of a tile. And
finally, the last value is the name of the tileset image to load.
The rest of the text in the file will the actual map data. 6 lines each containing 8 integer values, separated by a commas. Copy the text below and save it
to a file called map1.txt in your media folder.
8,6,48,tileset.png
4,4,4, 4, 4, 4,4,4
4,4,4, 4, 4, 4,4,4
4,4,4, 1, 2, 3,4,4
4,4,4, 6, 7, 8,4,4
4,4,4,11,12,13,4,4
4,4,4,4, 4, 4, 4,4
The spacing is not important, that is merely to give you somewhat of a visual idea of how the map data will work. All the 4's will draw a grass tile (see the pic above)
while the other numbers reference tiles to place a pond of water.
Loading The Map
In the most basic of scenarios, you can load all your data into a single integer array but this will severely limit your options if you plan to do anything more than simply display the map. We are going to create two user-defined types (UDT), one for the map and another for the map tiles.
Type UDT_Tile
	id  as integer
	spr as integer
EndType


Type UDT_Map
	width    as integer
	height   as integer
	tileSize as integer
	data     as UDT_Tile[0,0]
EndType

map as UDT_Map
UDT_Tile will contain the IDs from the map file, which are just the animation frame numbers. The spr variable contains the sprite ID of that tile. There's no
need to track the position of the tile, its location in the map array takes care of that as you'll see later.UDT_Map is our map structure. Everything we need to know about the map is contained here. The map's width and height, the size of each tile, and a 2D array containing all the map tiles. Once we begin to load the map file the data array will be resized to match.
Aside from a few temp variables used for loading, that's it. That is all the info you will need to properly build your tile map. Now let's get on with loading the actual map. Open the map1.txt file for reading and read in the first line. Using the string tokenizer functions we can easily split up the data between the commas and assign each value to our variables. GetStringToken2 differs from GetStringToken in that it only accepts a single delimiter. Our only delimiter in the file is a comma so for efficiency we use this version of the function. It also recognizes empty fields, which can be important if your map doesn't use a tile in every position. This is more likely when you get into multi-layered maps. You can achieve the same result by using a single dimension array, but I find using a 2D for a map to be easier to work with and requires less calculations.
// Open file for reading
f = openToRead("map1.txt")

// Read first line
r$ = readLine(f)
map.width    = val(getStringToken2(r$, ",", 1))
map.height   = val(getStringToken2(r$, ",", 2))
map.tileSize = val(getStringToken2(r$, ",", 3))
imgFilename$ = getStringToken2(r$, ",", 4)

// Redfine the size of the 2D array
map.data.length = map.width

for x = 0 to map.width-1
	map.data[x].length = map.height
next x

// Load map data
for y = 0 to map.height-1
	r$ = readLine(f)
	for x = 0 to map.width-1
		map.data[x, y].id = val(getStringToken2(r$, ",", x+1))
	next
next y

// Don't forget to close the file
closeFile(f)
Resizing multi-dimensional arrays in AGK2 can be a little odd. Each dimension needs to have its length set. So in our case where the map is 8 by 6, we'll have 8 columns
that will each need resized with the other dimension, which is the number of rows. Remember, your columns are along the X-axis while rows are along the Y-axis.Now, we read each line of the text file and use the tokenizer to split each number (animation frame ID).
Creating/Showing The Map
First, load the tileset image and create the "dummy" sprite.
spr_base = createSprite(loadImage(imgFilename$))
tileCount = (getSpriteWidth(spr_base)  / map.tileSize) * (getSpriteHeight(spr_base) / map.tileSize)
setSpriteAnimation(spr_base, map.tileSize, map.tileSize, tileCount)
The sprite automatically takes on the dimensions of the image with which it was created. Using the width and height dimensions and knowing the tile size, we can calculate
the number of tiles in that image which is used to build the animated sprite.Next, clone the sprite for each tile in the map array and set its position based on its array location.
for y = 0 to map.height-1
	for x = 0 to map.width-1
		map.data[x, y].spr = cloneSprite(spr_base)
		setSpriteFrame(map.data[x, y].spr, map.data[x, y].id)
		setSpritePosition(map.data[x, y].spr, x*map.tileSize, y*map.tileSize)
	next
next y
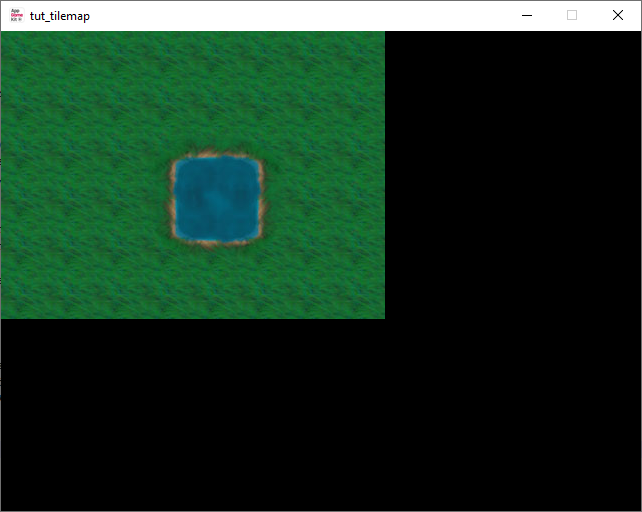
Run your program and if you've typed everything correctly you should see a map display on the screen like below.
Larger maps
Let's try something bigger! Below is a 16x16 map, save this into your media folder as map2.txt. Load this map into your program and run it. Notice you didn't have to change a single thing (other than the filename) to load the map?
16,16,48,tileset.png
4,4,4, 4, 4, 4,4,4,4,4, 4, 4, 4, 4,4,4
4,4,4, 4, 4, 4,4,4,4,4, 4, 4, 4, 4,4,4
4,4,5, 1, 2, 3,4,4,4,4, 1, 2, 2, 3,4,4
4,4,4, 6, 7, 8,4,4,4,4, 6, 7, 7, 8,4,4
4,4,4,11,12,13,4,4,4,4, 6, 7, 7, 8,4,5
4,4,4,4, 4, 4, 4,4,4,4, 6, 7, 7, 8,4,4
4,4,4,4, 4, 4, 4,4,4,4,11,12,12,13,4,4
4,4,4, 4, 4, 4,4,4,4,4, 4, 4, 4, 4,4,4
4,4,4, 4, 4, 4,4,4,4,4, 4, 4, 4, 4,4,4
4,4,4, 4, 5, 4,4,4,4,4, 4, 5, 4, 4,4,4
4,4,4, 4, 4, 4,4,4,4,4, 4, 4, 4, 4,4,4
4,4,4, 4, 4, 4,4,4,4,4, 4, 4, 4, 4,4,4
4,4,4, 4, 4, 4,4,5,4,4, 4, 4, 4, 4,5,4
4,4,4, 5, 4, 4,4,4,4,4, 4, 4, 4, 4,4,4
4,4,4, 4, 4, 4,4,4,4,4, 5, 4, 4, 4,4,4
4,4,4, 4, 4, 4,4,4,4,4, 4, 4, 4, 4,4,4
Just one problem however, we can't see the whole map! Looks like we'll need to implement some form of scrolling. For this, we'll need to add a couple new variables to the UDT_Map structure.
Simply add an X and Y variable defined as floats. You can use integers but floats can provide smoother scrolling depending on the speed at which you scroll. Next, build the function for
repositioning the map. The function below should be straight forward. We're creating an offset to add to the position the tiles. An important thing to note here is the pass by reference of the
map variable. Though not important for the actual positioning, it is how we save/update the offset values in the map object.
function setMapPosition(mx, my, m ref as UDT_Map)
	m.x = mx
	m.y = my

	for y = 0 to m.height-1
		for x = 0 to m.width-1
			ox = x*48 + m.x
			oy = y*48 + m.y
			setSpritePosition(m.data[x, y].spr, ox, oy)
		next
	next y
endfunction
If you're not sure what pass by reference means, continue reading, otherwise skip to the next paragraph. There are two ways to pass a variable to a function, the default way is by value and the other is by reference. When you pass by value, whatever you do to that variable has no effect on it outside of the function. If X equals 14 and I pass it to a function and inside that function I say X = 42, X will still be 14 everywhere outside of the function. But if you pass X by reference then X now equals 42 outside of that function. This is also more efficient in our case as the map object can potentially hold a large array passing a reference to it is less intensive than passing a copy of it.
In your main loop, you'll need to add the controls which are used scrolling the map. We keep it simple and use the arrow keys.
	scrollSpeed# = 2.0
	if getRawKeyState(37) // left
		setMapPosition(map.x-scrollSpeed#, map.y, map)
	endif
	if getRawKeyState(39) // right
		setMapPosition(map.x+scrollSpeed#, map.y, map)
	endif
	if getRawKeyState(38) // up
		setMapPosition(map.x, map.y-scrollSpeed#, map)
	endif
	if getRawKeyState(40) // down
		setMapPosition(map.x, map.y+scrollSpeed#, map)
	endif
Run your program and can now move the map around the screen using the arrow keys. There are other ways to move the map, for instance when the mouse gets near an edge of the screen as
commonly seen in RTS games. Or when your character walks near the screen edges it pushes the map over. Perhaps you want to keep a character centered on the map. While the character remains
stationary just the map will scroll. It all depends on what style of game you want but the function remains the same.Boundaries
If you ran your program at a 640x480 resolution as suggested for this tutorial, you'll notice a new problem when you started to scroll the map around. The map can scroll beyond the visible tiles and we simply can't have that! What we need is a few boundary checks that prevent scrolling too far. Checking the start of the map is simple, just make sure our X and Y offset values don't go less than 0. But what about the upper range? There are two factors that affect this upper boundary; the size of the tilemap and the window resolution. To understand why, look at the illustration below. You'll see our map, the yellow box representing the window resolution. This is what you'd call the viewport.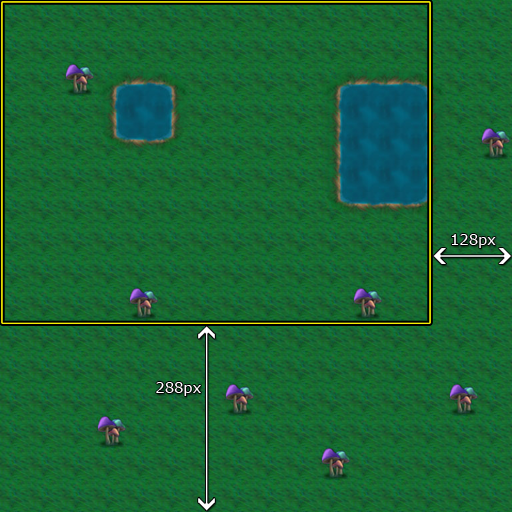
The pixel resolution of the entire map is 768 x 768, that is 16 tiles times a tile size of 48. With a window resolution of only 640 x 480, that means there are 128px horizontally offscreen and 288px vertically offscreen.
	offscreenX = 768 - 640
	offscreenY = 768 - 480
	map.maxX = (map.width  * map.tileSize) - getVirtualWidth()
	map.maxY = (map.height * map.tileSize) - getVirtualHeight()
Then finally, finish writing the boundary checks in the setMapPosition function. Place the checks before the FOR loops that position the tiles.
	if m.x < 0 then m.x = 0
	if m.y < 0 then m.y = 0
	if m.x > m.maxX then m.x = m.maxX
	if m.y > m.maxY then m.y = m.maxY
Conclusion
You should now have an understanding of how to create a tilemap from a file, scroll around, and manage its structure in code. For the complete working example you can find it below.
Part 2 of the tutorial will cover collision detection and other yet to be determined features.
SetErrorMode(2)
SetWindowTitle( "tut_tilemap" )
SetWindowSize(640,480, 0 )
SetVirtualResolution( 640,480)
SetSyncRate(60, 0 )
UseNewDefaultFonts( 1 )


Type UDT_Tile
	id  as integer
	spr as integer
EndType


Type UDT_Map
	width    as integer
	height   as integer
	tileSize as integer
	data     as UDT_Tile[0,0]
	x	     as float
	y        as float
	maxX     as integer
	maxY     as integer
EndType

map as UDT_Map


// Open file for reading
f = openToRead("map2.txt")

// Read first line
r$ = readLine(f)
map.width    = val(getStringToken2(r$, ",", 1))
map.height   = val(getStringToken2(r$, ",", 2))
map.tileSize = val(getStringToken2(r$, ",", 3))
imgFilename$ = getStringToken2(r$, ",", 4)

// Redfine the size of the 2D array
map.data.length = map.width

for x = 0 to map.width-1
	map.data[x].length = map.height
next x

// Load map data
for y = 0 to map.height-1
	r$ = readLine(f)
	for x = 0 to map.width-1
		map.data[x, y].id = val(getStringToken2(r$, ",", x+1))
	next
next y

// Don't forget to close the file
closeFile(f)

// Calculate the max boundaries for map scrolling
map.maxX = (map.width  * map.tileSize) - getVirtualWidth()
map.maxY = (map.height * map.tileSize) - getVirtualHeight()

// The base of all tile sprites used in this map
spr_base = createSprite(loadImage(imgFilename$))

// Number of tiles in this tileset
tileCount = (getSpriteWidth(spr_base)  / map.tileSize) * (getSpriteHeight(spr_base) / map.tileSize)

setSpriteAnimation(spr_base, map.tileSize, map.tileSize, tileCount)

// Position the map tiles
for y = 0 to map.height-1
	for x = 0 to map.width-1
		map.data[x, y].spr = cloneSprite(spr_base)
		setSpriteFrame(map.data[x, y].spr, map.data[x, y].id)
		setSpritePosition(map.data[x, y].spr, x*map.tileSize, y*map.tileSize)
	next
next y

setSpriteVisible(spr_base, 0) // don't need to see this


do


    // Use arrow keys to scroll the map
    if getRawKeyState(37) // left
		setMapPosition(map.x-2, map.y, map)
	endif
	if getRawKeyState(39) // right
		setMapPosition(map.x+2, map.y, map)
	endif
    if getRawKeyState(38) // up
		setMapPosition(map.x, map.y-2, map)
	endif
	if getRawKeyState(40) // down
		setMapPosition(map.x, map.y+2, map)
	endif


    Sync()
loop


// Updates the position of the map and
// prevents scrolling outside of the map's area
function setMapPosition(mx, my, m ref as UDT_Map)
	m.x = mx
	m.y = my

	if m.x < 0 then m.x = 0
	if m.y < 0 then m.y = 0
	if m.x > m.maxX then m.x = m.maxX
	if m.y > m.maxY then m.y = m.maxY

	for y = 0 to m.height-1
		for x = 0 to m.width-1
			ox = x*m.tileSize - m.x
			oy = y*m.tileSize - m.y
			setSpritePosition(m.data[x, y].spr, ox, oy)
		next
	next y
endfunction